Chapter 2 - Setting Up Your ADK Environment
This article is part of my web book series. All of the chapters can be found here and the code is available on Github. For any issues around this book, contact me on LinkedIn
Before we can start building sophisticated AI agents, it’s essential to set up a robust development environment. This chapter will guide you through installing the Agent Development Kit (ADK), verifying your setup, and familiarizing yourself with the core tools ADK provides to streamline your development workflow: the ADK Command Line Interface (CLI) and the ADK Development UI.
If you have already followed the steps in Appendix A to run the code examples (highly recommended), you don’t necessarily need to follow all of the following steps. However, it’s a good idea to glance over these sections before jumping to the “The ADK Command Line Interface (CLI)” section.
Prerequisites
To effectively use Google’s ADK, you’ll need the following:
- Python (3.9 or newer): ADK is a Python library. If you don’t have Python installed, or have an older version, download the latest stable release from python.org.
- To check your Python version, open your terminal or command prompt and type:
1
2
3
4
 python --version
 # or
 python3 --version
- pip (or uv): Python’s package installer.
pipusually comes bundled with Python installations.uvis a newer, faster alternative that can be used if preferred. - Google Cloud Account (Recommended, but optional):
- Many ADK features, especially those related to persistent storage (databases, GCS for artifacts), managed session services, and Vertex AI integrations, will require a Google Cloud Platform (GCP) account.
- You can sign up for a free trial at cloud.google.com.
- Google Cloud SDK (
gcloudCLI): If you plan to use GCP services, installing thegcloudCLI is highly recommended for authenticating and managing your cloud resources. Installation instructions can be found here.
- Google API Key (if Using Gemini models):
- If you intend to use Google’s Gemini models directly (not through Vertex AI endpoints that might use service accounts), you’ll need an API key.
- Obtain one from Google AI Studio: https://aistudio.google.com/app/apikey
- Remember to set the
GOOGLE_API_KEYenvironment variable.
- Virtual Environment (Highly Recommended):
- It’s a best practice in Python development to use virtual environments to manage project dependencies and avoid conflicts between different projects.
To create a virtual environment:
1
2
  python -m venv .venv  # Creates a virtual environment named '.venv'
- To activate it:
- Linux/macOS:
source .venv/bin/activate - Windows (Command Prompt):
.venv\Scripts\activate - Windows (PowerShell):
.\.venv\Scripts\Activate.ps1
- Linux/macOS:
- You’ll know it’s active when your terminal prompt is prefixed with
(.venv). Deactivate by typingdeactivate.
Best Practice: Always Use Virtual Environments
Consistently using virtual environments (like venv or conda) for your ADK projects is crucial. It isolates dependencies, prevents conflicts between projects, and makes your project more reproducible across different machines or by other developers.
Installation: Stable vs. Development Versions
We’ll use pip in our setup as it is currently more commonly used among developers. ADK offers two main ways to install the library:
Stable Release (Recommended for most users): This is the latest officially released version, tested and published on PyPI (the Python Package Index).
1
2
  pip install google-adk
The ADK team aims for a weekly release cadence, so this version is usually quite up-to-date.
Development Version (For bleeding-edge features or fixes): If you need access to features or bug fixes that haven’t made it into an official release yet, you can install directly from the
mainbranch of the GitHub repository.1 2
pip install git+https://github.com/google/adk-python.git@mainCaution: While this gives you the latest code, it might also include experimental changes or bugs not present in the stable release. Use this primarily for testing upcoming changes or when a critical fix you need is only available on
main.
For this book, we will assume you are using the stable release unless otherwise specified. The code examples have been tested with ADK v1.2.0.
Consider uv for Faster Dependency Management
While pip is standard, uv is a significantly faster package installer and resolver written in Rust. For larger projects or frequent dependency updates, uv sync can save considerable time compared to pip install -r requirements.txt.
Verifying Your Installation
After installation, you can verify that ADK is correctly installed and accessible.
Check the version using
pip:1 2
pip show google-adkThis will display information about the installed package, including its version.
Import ADK in a Python interpreter: Open a Python interpreter (by typing
pythonorpython3in your terminal) and try to import a core ADK class:1 2 3 4 5
>>> from google.adk.agents import Agent >>> print("ADK imported successfully!") ADK imported successfully! >>> exit()
If this runs without errors, ADK is installed correctly.
Check the ADK CLI: The ADK package also installs a command-line interface tool named
adk. Test it by running:1 2
adk --versionThis should print the installed ADK version (e.g.,
adk, version 1.0.0). You can also see available commands with:1 2
adk --help
The ADK Command Line Interface (CLI)
The ADK CLI (adk) is a powerful tool for managing your ADK projects and agents. It simplifies common tasks like creating new agents, running them locally, evaluating their performance, and deploying them.
Here’s an overview of its main commands (we’ll explore these in more detail in later chapters):
adk create <agent_directory_name>:- Scaffolds a new ADK agent project with a basic directory structure and example files. This is the recommended way to start a new ADK project.
- Example: This creates a directory
my_new_chatbot/with files likeagent.py,__init__.py, and an .env file with the API key you provided as input.
1
2
3
  adk create my_new_chatbot
  cd my_new_chatbot
adk run <agent_module_path> [options]:- Runs an ADK agent from the command line in an interactive turn-by-turn mode.
<agent_module_path>is typically the path to the directory containing your agent file file (or theagent.pyfile itself).- Example (assuming you’re in the
my_new_chatbotdirectory created above): Or, if your agent definition is in a specific file: It will then prompt you for user input.
1
2
3
  # This assumes 'my_new_chatbot/agent.py' defines 'root_agent'
  adk run .
Start this and the following commands from the parent directory of
my_new_chatbotand not insidemy_new_chatbot, otherwise you will get an error that no agent is found.
adk web <agent_module_path> [options]:Starts a local web server hosting the ADK Development UI for the specified agent(s). This is invaluable for interactive testing, debugging, and visualization.
Example:
This will typically start the server on
http://127.0.0.1:8000. You can then open this URL in your web browser.1 2 3
cd .. adk web .
adk eval <agent_module_path> <eval_set_file_or_dir> [options]:- Runs evaluations on your agent using a predefined evaluation dataset. We’ll cover this in detail in a later chapter.
- Example (conceptual, assuming an eval set exists):
1
2
  adk eval . ./eval_sets/my_test_cases.evalset.json
adk deploy cloud_run <agent_module_path> [options]:- Helps deploy your ADK agent to Google Cloud Run. This involves containerizing your agent and configuring the Cloud Run service. We’ll cover deployment in a later chapter.
adk api_server [options] [agents_dir]:- Starts a FastAPI server for agents. This command will come in very handy for when you want to host your Agentic UI separately. This will allow you to run your agent code as a normal FastAPI backend.
- Example: This will start a FastAPI server on
http://127.0.0.1:8000, while allowing the UI running onhttp://127.0.0.1:4200to access the agent. The logging level is set to debug to get a deeper look at the inner events.
1
2
  adk api_server --allow_origins=http://localhost:4200 --host 0.0.0.0 --port 8000 --log_level debug .
You can always get more help on a specific command by using --help, for example:
1
2
3
adk run --help
adk web --help
Best Practice: Use
adk create <agent_directory_name>for New ProjectsThe
adk create <agent_directory_name>command is the recommended way to start new ADK projects. It sets up a standard directory structure and provides boilerplate code, helping you get started quickly and follow common ADK conventions.
Introducing the ADK Development UI
The ADK Development UI, launched via adk web <agent_module_path>, is one of ADK’s most helpful features for local development.
It provides a web-based interface to:
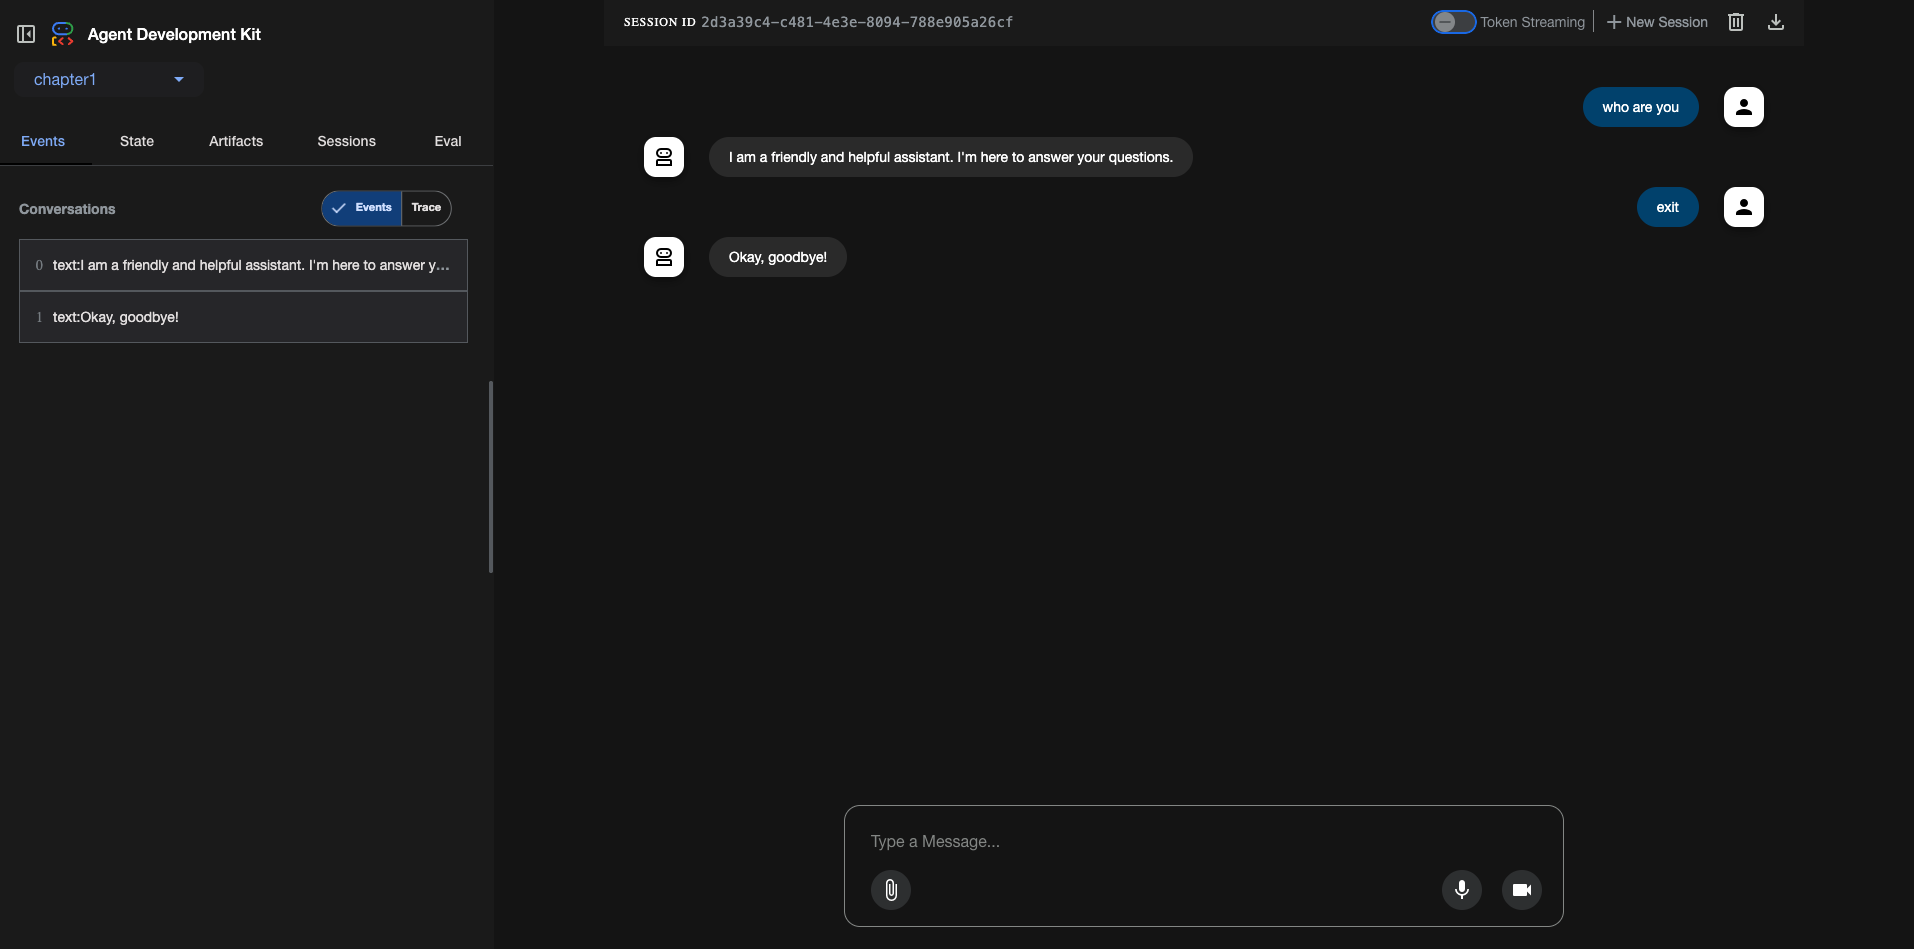
- Interact with your agent(s): A persistent main chat panel allows you to send messages and see responses in a conversational format.
- Review Conversation History: The “Events” tab in the left sidebar lists all individual events (user inputs, agent text responses, function calls, function responses) that make up the current conversation shown in the main chat panel.
- Inspect agent execution: The “Trace” toggle (found near or within the “Events” tab section in the sidebar) activates a Trace View panel. This panel displays a detailed, hierarchical, and timeline-based visualization of agent invocations, including LLM calls, tool usage, and state changes, typically related to the most recent interaction or a selected event.
- Debug issues: Understand the flow of control and data within your agent or multi-agent system by examining these traces alongside your ongoing chat.
- Manage and run evaluations: The “Eval” tab is dedicated to visually inspecting evaluation cases and their results.
- View Agent State and Artifacts: Inspect the current session state (“State” tab) and any stored artifacts (“Artifacts” tab).
- Manage Sessions: View, switch between, or delete active/past sessions (“Sessions” tab).
Launching the Dev UI:
Navigate to your agent project directory: If you used
adk create my_new_chatbot, then:1 2
cd my_new_chatbotEnsure your
agent.py(or equivalent) definesroot_agent: Theadk webcommand looks for a variable namedroot_agentin the Python module it loads. Thisroot_agentshould be an instance of an ADKAgent(or a class derived fromBaseAgent).
Let’s slightly modify the agent.py that adk create might generate, or create a simple one:
1
2
3
4
5
6
7
8
from google.adk.agents import Agent

root_agent = Agent(
    name="ui_test_agent",
    model="gemini-2.0-flash",
    instruction="You are a helpful assistant designed for the ADK Dev UI.",
)
Start the Dev UI: From the parent of
my_new_chatbotdirectory:1 2
adk web .You should see output similar to this in your terminal:
1
2
3
4
5
6
7
8
9
10
11
12
 INFO:     Started server process [<process id>]
 INFO:     Waiting for application startup.

 +-----------------------------------------------------------------------------+
 | ADK Web Server started                                                      |
 |                                                                             |
 | For local testing, access at http://localhost:8000.                         |
 +-----------------------------------------------------------------------------+

 INFO:     Application startup complete.
 INFO:     Uvicorn running on http://127.0.0.1:8000 (Press CTRL+C to quit)
Open in Browser: Open your web browser and navigate to
http://127.0.0.1:8000.
You should see the ADK Development UI.
The Dev UI is Your Best Friend for Debugging
Get comfortable with the ADK Development UI early on, especially the “Trace” view. It provides unparalleled insight into your agent’s decision-making process, LLM interactions, and tool usage, making debugging significantly easier than relying on print statements alone.
Exploring the Dev UI Tabs
The ADK Development UI typically features these key areas:
Top Bar
Contains application/agent selectors, current session ID, and session controls (New Session, Streaming toggle, etc.).
Main Chat Panel (Persistent, e.g., Center/Right)
This is your primary interaction area. You type messages here, and the agent’s responses appear conversationally. This panel remains visible even when viewing traces or other details.
State
Allows inspection of current session state.
Artifacts
Lists saved artifacts.
Sessions
Manages conversation sessions.
Eval
For running and inspecting evaluation sets.
Events (Default Tab)
Events / Trace Toggle: This crucial control, located within or near the “Events” tab section in the sidebar, determines what additional detail is shown or how the system visualizes execution.
Events View (Default state of toggle)
Focuses on the event list and the live chat interaction in the Main Chat Panel.
Trace View (When “Trace” is toggled)
Activates or brings focus to a Trace View panel (this could be a section that appears below/beside the chat, or a modal, or the left sidebar itself might transform). This panel displays a Gantt-chart-like hierarchical trace for agent invocations. As shown in the example trace image, this view visualizes:
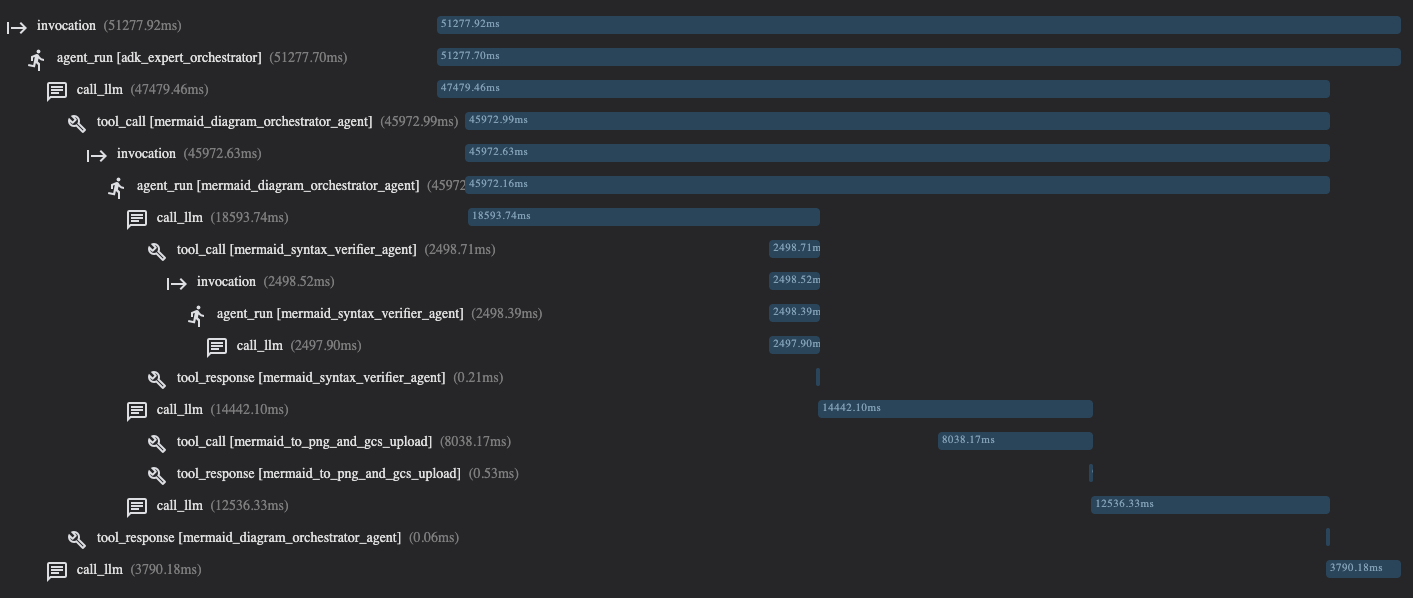
- Overall Invocation: The top-level entry (e.g., invocation (51277.92ms)) representing the entire processing of a user’s turn, with its total duration.
- Agent Runs: Nested under the invocation, entries like agent_run [adk_expert_orchestrator] (51277.70ms) show which agent was active and for how long. These can be further nested if it’s a multi-agent system (e.g., agent_run [mermaid_diagram_orchestrator_agent]).
- LLM Calls: Entries like call_llm (47479.46ms) show the duration of direct interactions with the Large Language Model.
- Tool Calls & Responses:
- tool_call [mermaid_diagram_orchestrator_agent] (45972.99ms) indicates a tool being invoked by an agent. The tool name (and sometimes the agent that owned/called it) is shown.
- tool_response [mermaid_syntax_verifier_agent] (0.21ms) shows the result/response from a tool execution.
- Nested Invocations: If one agent calls another (e.g., via an AgentTool), this creates a nested invocation within the trace, as seen with the second invocation (45972.63ms) in the example image.
- Timings: Each step in the trace is associated with its execution time, providing performance insights.
- Hierarchy: The indentation clearly shows the parent-child relationships between operations (e.g., an LLM call or tool call happens within an agent run).
Dev UI is for Local Development
The ADK Development UI (adk web) is designed for local development and testing. It’s not intended to be a production-ready frontend for your deployed agents. For production, you’ll typically build a custom UI or integrate the agent into an existing application backend.
Your First “Hello, World!” ADK Agent (Revisited with CLI)
Earlier, we ran a simple agent directly with a Python script. Let’s adapt that slightly to fit the structure expected by adk create and run it using the ADK CLI tools.
Create a new agent project:
1
2
3
 adk create hello_adk_agent
 cd hello_adk_agent
This will create a directory named
hello_adk_agentwith a basicagent.pyand other files.Modify
agent.py: Openhello_adk_agent/agent.pyand ensure it looks similar to this (or replace its content):1 2 3 4 5 6 7 8 9 10 11
# hello_adk_agent.py from google.adk.agents import Agent # This is the agent the ADK CLI and Dev UI will pick up by default. root_agent = Agent( name="greeting_agent", model="gemini-2.0-flash", instruction="You are a cheerful agent that greets the user and asks how you can help them.", description="A friendly agent that initiates conversations.", )
Run with
adk run: From inside thehello_adk_agentdirectory:1 2
adk run .This will start an interactive session in your terminal:
1
2
3
4
5
6
7
 Session ID: <some_generated_id>
 User ID: <some_generated_id>
 Starting chat with agent: greeting_agent. Type "exit" to end.
 You: Hello!
 Agent: Hello there! I'm the greeting_agent. How can I help you today?
 You:
Run with
adk web: Stop theadk runcommand (usually Ctrl+C). Then, from the parent directory ofhello_adk_agentdirectory:1 2 3
cd .. adk web .
Open
http://127.0.0.1:8000in your browser.- You should see “hello_adk_agent” listed as an app (or a default app name).
- Select “greeting_agent”.
- Try sending “Hi there!” in the chat interface.
- Check the “Trace” tab to see the interaction details.
Following is the sequence diagram for the Dev UI interaction (after initial page load) is:
---
title: Dev UI interaction (after initial page load)
---
    sequenceDiagram
        participant User
        participant WebBrowser as "Dev UI (Browser)"
        participant UvicornServer as "Uvicorn (Web Server)"
        participant Runner
        participant GreetingAgent as "greeting_agent (LlmAgent)"
        participant GeminiModel as "Gemini LLM"

        User->>WebBrowser: Types "Hi there!" in Chat tab
        WebBrowser->>UvicornServer: Sends message (e.g., via WebSocket or HTTP POST)
        UvicornServer->>Runner: Creates/gets session, appends user message
        Runner->>GreetingAgent: Invokes run_async() with user message
        GreetingAgent->>GeminiModel: Sends prompt
        GeminiModel-->>GreetingAgent: Returns LLM response
        GreetingAgent-->>Runner: Yields Event(s)
        Runner-->>UvicornServer: Forwards Event(s)
        UvicornServer-->>WebBrowser: Streams/sends Event(s) back
        WebBrowser-->>User: Displays agent's response in Chat tab
        WebBrowser-->>User: (Optionally) Updates Trace tab with execution details
You’ve now successfully set up your ADK environment, installed the necessary tools, and run a basic agent using both the command-line runner and the interactive Development UI. This foundation will be crucial as we move on to building more complex agents with custom tools and logic.
What’s Next?
Next we will take a deeper dive into the core concepts and building blocks of ADK, such as Agents, Runners, Tools, Models, Sessions, and Events. This will provide you with a solid theoretical understanding before we start constructing more advanced agents.