Advanced Tips for Mastering Google Antigravity

If you’ve used Google’s new Antigravity IDE since it dropped in November 2025, you know it’s not just another VS Code fork. It’s a paradigm shift. We aren’t just completing code anymore; we are orchestrating it.
Antigravity introduces an “Agent-First” workflow that feels less like typing and more like managing a small team of engineers. But if you’re still using it like a standard editor — just hitting tab for autocomplete — you are leaving 90% of its power on the table.
After a few weeks of heavy usage, here are a few advanced tips.
Master Parallel Agent Orchestration
The “Agent Manager” isn’t just a fancy history tab; it’s a parallel processing engine. Most beginners wait for one agent to finish a task before starting another. Don’t do this.
Antigravity allows you to spawn multiple asynchronous agents effectively. You can have Agent A refactoring your messy legacy authentication module while Agent B is simultaneously writing a Jest test suite for the current version of that same module to ensure backward compatibility.
Pro Tip: Treat your agents like specialized contractors. Instead of one vague prompt (“Fix the auth and add tests”), spin up two distinct threads:
- Thread 1: “Refactor
auth.tsto use the new provider pattern. Do not change behavior.” - Thread 2: “Write comprehensive unit tests for
auth.tscovering edge cases.” By the time you grab a coffee, both heavy-lift tasks are done, and you just need to merge.
Make Antigravity your own
In Antigravity, Rules and Workflows are the two primary mechanisms for customizing agent behavior. They serve distinct purposes: Rules are passive constraints (context injected into the model), while Workflows are active procedures (repeatable tasks triggered by you).
Here is the detailed breakdown of how each works, where they live, and how to configure them.
Rules
Rules are persistent instructions that “guide” the agent’s thinking. They act like a System Prompt that is always running in the background. You use Rules to enforce coding standards, architectural patterns, or project-specific constraints without having to repeat them in every chat message.
How They Work
- Activation: They are applied automatically based on their configuration (e.g., always on, or only for specific file types).
- Format: Standard Markdown (
.md) files. - File Location:
- Workspace Rules: Stored in
.agent/rules/within your project root / workspace folder. - Global Rules: Stored in
~/.gemini/GEMINI.mdon your local machine (applies to all projects / workspaces).
- Workspace Rules: Stored in
Configuration Options
When you create a rule (via the UI or manually), you can define its Activation Mode (one of the following):
- Always On: The rule is injected into the context for every prompt. (Best for “No PII logging” or “Use TypeScript Strict Mode”).
- Glob Pattern: In this mode, the rule only activates when the agent is working on files matching a pattern (e.g.,
**/*.test.ts). - Model Decision: The agent decides if the rule is relevant to the current task.
- Manual: You must explicitly reference it (e.g.,
@security-rule) to activate it.
Example: .agent/rules/style-guide.md
1
2
3
4
# Frontend Style Guide
- All React components must be functional components.
- Use Tailwind CSS for styling; do not create separate CSS files.
- Interfaces must be prefixed with `I` (e.g., `IUser`).
Workflows
Workflows are Saved Prompts or “Playbooks” that you trigger on demand. They are designed for complex, multi-step tasks that you perform frequently, such as “Review this PR,” “Generate Unit Tests,” or “Refactor this module.”
How They Work
- Activation: Triggered manually by typing
/followed by the workflow name in the chat (e.g.,/test). - Format: Markdown (
.md) files containing a sequence of instructions. - File Location:
- Workspace Workflows: Stored in
.agent/workflows/within your project / workspace root. - Global Workflows: Stored in
~/.gemini/antigravity/global_workflows/.
- Workspace Workflows: Stored in
Structure
A workflow file usually looks like a numbered list of steps. The agent executes them sequentially. You can even chain workflows (e.g., a “Ship Feature” workflow that calls a “Run Tests” workflow).
Example: .agent/workflows/review.md
When you type /review in the chat, the agent executes this:
1
2
3
4
5
6
7
8
# Pull Request Review Protocol
1. Analyze the git diff between the current branch and `main`.
2. Check for:
   - Security vulnerabilities (SQL injection, XSS).
   - Console logs (ask to remove them).
   - Missing unit tests for new logic.
3. If tests are missing, **STOP** and ask the user if they want to generate them.
4. Otherwise, generate a summary table of changes in Markdown.
The “Artifact-First” Review Workflow
We are used to reading code diffs. In Antigravity, you need to learn to read Artifacts.
Before writing a single line of code, Antigravity agents generate high-level Artifacts — Task Lists, Implementation Plans etc. The mistake most users make is auto-approving the “Plan” stage to get to the coding faster.
Pro Tip: Rigorous interrogation at the Artifact stage. If the Implementation Plan looks slightly off, edit the plan directly or comment on the Artifact itself. Correcting the agent’s logic before it generates 500 lines of code saves you hours of debugging later. If the agent proposes a library you hate in the Plan Artifact, veto it there. It learns faster from rejected plans than rejected code.
Supercharge Antigravity with MCP Servers (Model Context Protocol)
If Antigravity’s agents are the brains of your IDE, MCP servers are its “nerves” out into the rest of your tools and infrastructure. MCP (Model Context Protocol, originally from Anthropic) is quickly becoming the USB-C of AI apps: a standard way for AI agents in IDEs (VS Code, JetBrains, Antigravity, etc.) to talk to external tools like databases, SaaS APIs, file systems, and more.
In Antigravity, MCP servers show up as extra tools and resources the agent can call: think “ask Firebase to deploy this,” “query Power BI,” “talk to Supabase,” “use Qdrant as a vector store,” or “drive Blender from natural language.”
What MCP Servers Actually Give You
Each MCP server exposes one or more tools behind a consistent protocol:
- Tools – things the agent can do: run queries, send emails, call APIs, manipulate files, trigger deployments, etc.
- Resources – external data the agent can read, like documents, dashboards, or datasets.
- Prompts – reusable prompt templates defined by the server (e.g., “generate a changelog,” “summarize this PR”).
Because the protocol is standard, any MCP-compatible server can be plugged into Antigravity to instantly extend what your agents can do, without writing custom integration code for each service. For example:
- Firebase MCP gives the agent tools to set up projects, configure Auth/Firestore, and even deploy hosting directly from the IDE.
- Power BI MCP lets you query Fabric semantic models and explore metrics using natural language right inside Antigravity.
- Rube MCP aggregates a bunch of dev tools (GitHub, Jira, Supabase, mail, etc.) behind a single server so the agent can automate code reviews, send summaries to Slack/Gmail, and bootstrap backends.
- Blender MCP enables the model to control Blender: create 3D models, apply materials, and more via text prompts.
In practice, MCP servers turn Antigravity from “IDE that writes code” into “IDE that can also operate your dev stack.”
Adding MCP Servers via the MCP Store
Antigravity ships with a UI for discovering and managing MCP servers, plus a raw config file for custom ones. The high-level flow:
Open the MCP Store
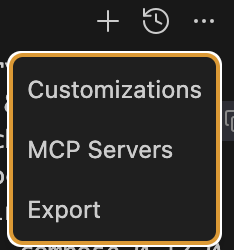
- In Antigravity, start any Agent session.
- In the agent side panel, click the “…” menu at the top and choose “MCP Servers” – this opens the MCP Store view.
Install from the store (one-click servers)
- In the MCP Store, you’ll see a list of featured / recommended servers (e.g., Firebase, Sequential Thinking, Power BI, Rube, etc., depending on what’s installed and your version).
- Click Install on any server you want. Antigravity handles fetching and wiring it; you just go through any OAuth or token prompts needed.
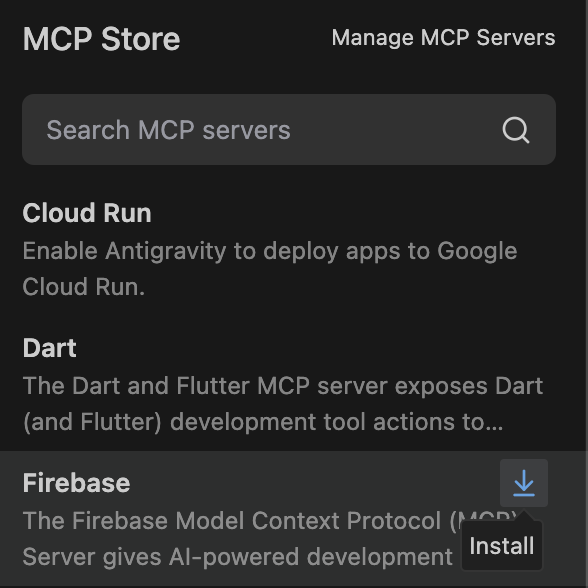
- Once installed, the server’s tools become available to the agent automatically in relevant workspaces.
Manage and inspect existing MCP servers
- From the same MCP Store screen, click “Manage MCP Servers” to see what’s already configured and which tools each server exposes.
- Hitting Refresh after editing config or installing new servers will rescan and show updated tool counts.
Adding a Custom MCP Server (mcp_config.json)
For servers not in the store (or your own internal ones), you edit a JSON config file:
- In MCP Store → Manage MCP Servers, click “View raw config”. This opens
mcp_config.json.
- Add your server under the
mcpServersobject, specifying how to start it.
1
2
3
4
5
6
7
8
9
10
11
12
13
14
15
16
17
18
19
20
{
  "mcpServers": {
    "sequential-thinking": {
      "command": "npx",
      "args": [
        "-y",
        "@modelcontextprotocol/server-sequential-thinking"
      ]
    },
    "context7": {
      "command": "npx",
      "args": [
        "-y",
        "@upstash/context7-mcp",
        "--api-key",
        "" // your Context-7 API key
      ]
    }
  }
}
- Save the file, go back to Manage MCP Servers, and click Refresh – Antigravity will restart / reconnect servers and list their tools.
This pattern is the same for most MCP servers: they’ll document their command, args, and required env vars; you paste that into mcp_config.json and you’re done.
How MCP Servers Show Up Inside Agent Workflows
Once a server is configured:
- The agent discovers its tools automatically and can call them as part of its plan (e.g., “deploy to Firebase,” “list GitHub issues,” “query Qdrant,” “generate slides,” etc.).
- Antigravity surfaces these tools as capabilities in the Agent Manager; you’ll often see them referenced in the agent’s plan or step logs (“Using tool:
firebase.deploy”, “Using tool:qdrant.upsertVectors”, etc.). - You can also constrain or approve tool usage depending on your review/terminal settings, which is important when tools can do side-effectful things (send emails, modify DBs, deploy apps).
This means you can design higher-level prompts like:
- “Scaffold a CRUD API and create the Supabase schema for it,” and let the agent call a Supabase MCP for DB creation.
- “Summarize the open PRs and email my team a digest,” and let the agent use GitHub + Slack/Gmail tools behind a single Rube MCP server.
- “Deploy this Next.js app to Firebase Hosting and give me the URL,” handled via the Firebase MCP tools.
In other words, MCP servers turn your agent into a full workflow orchestrator across your dev stack, instead of a glorified autocomplete.
Security and Best Practices
Because MCP servers can run arbitrary code or reach sensitive systems, treat them like any other powerful dev tool:
- Only add servers from sources you trust, and read their README / docs before wiring them in.
- Prefer official or well-known servers (e.g., Firebase, Databricks, Qdrant, Context-7) that are listed in the MCP server registry.
- Start with conservative review and terminal policies so the agent has to ask before using dangerous tools or commands.
- For internal MCP servers, keep credentials in environment variables or secret managers, not hard-coded in config.
Used thoughtfully, MCP effectively lets you say: “Antigravity, you’re allowed to operate these tools on my behalf” — and then your prompts and workflows become much more powerful.
Optimize Model Usage and Manage AI Resources
Under the hood, Antigravity’s intelligence comes from large AI models – notably Google’s Gemini 3 Pro and others like Anthropic’s Claude Sonnet / Opus 4.5. As an advanced user, you should be mindful of which model you’re using for which task, and how to manage the resource constraints:
Choose the Right Model per Task: Antigravity lets you choose from multiple models for each agent conversation. Gemini 3 Pro (High and Low variants) is the flagship model, offering powerful coding capabilities. Claude Sonnet / Opus 4.5 (which might come in “Standard” and an even more reasoning-intensive “Thinking” mode) is another option, as well as an open-source GPT-OSS model. Each model has its strengths – for example, Gemini might excel at understanding Google APIs or complex code generation, while Claude might be better at conversational reasoning or writing documentation. If you find one model giving subpar answers for a certain problem, don’t hesitate to switch and retry the task with a different model. As the Antigravity guide notes, different models are better at different things, so you can switch based on what you need. This flexibility ensures you’re not stuck if one model gets something wrong – another might handle it with ease.
Understand Preview Limitations: At the time of writing, Antigravity is in a free public preview. This means you have generous but finite usage of the AI models. Google supplies a fixed quota for model tokens/calls that replenishes every few hours or weekly. There are currently no paid tiers or ability to bring your own model – you’re using Google’s hosted models with those limits. In practice, it takes a lot of coding to hit the ceiling, but if you’re working nonstop with the AI, be aware that you might need to wait for the quota to refill occasionally. Plan long sessions or big tasks accordingly; you wouldn’t want the AI to stop in the middle of an important refactor due to quota (the IDE will warn you if you’re near the limit).
Keep an Eye on Agent “Memory”: Each agent conversation retains context (the code it’s seen, the discussion so far). Antigravity also introduces persistent Knowledge Items that survive across sessions – essentially, it can remember certain insights or patterns from previous tasks. This is great for not repeating mistakes (the agent “learns” from feedback). However, large context can also lead to the model working slower or sometimes getting confused if too much history is irrelevant. As a user, it’s good to occasionally reset or start a fresh agent if you feel it’s getting bogged down by context. Also, if you reorganize your project / workspace (say, move the directory), be mindful that it might disrupt the stored knowledge the agent had about it (current versions have an issue where moving the project / workspace folder can silently break the linkage to its knowledge store).
Model Updates: Google is iterating fast. New model versions or entirely new models might become available in Antigravity. Stay updated with release notes – switching to a newer model could instantly give you better results. Also, note that model “High” vs “Low” variants typically trade off quality for speed; if you need a quick answer and quality is secondary, use a smaller model or low setting to save time.
In summary, treat model selection as another tool in your toolbox. The default (Gemini 3 Pro High) is a great generalist, but you have alternatives when needed. And be aware of the preview’s limits so you’re not caught off guard. By optimizing model usage, you ensure that the AI help you’re getting is both efficient and effective for the task at hand.
Automate Testing and UI Checks with the Integrated Browser Agent
Testing – especially UI testing – is often a tedious part of development. Antigravity tackles this head-on with its Browser Agent, a specialized AI that can spin up an actual browser, interact with your web application, and even record the process for you. This goes beyond traditional unit tests by performing end-to-end behavior like a human tester would, but on autopilot.
How the Browser Agent Works: Under the hood, the browser agent can control Chrome (or a Chromium-based browser) to simulate user actions. It can click buttons, fill out forms, scroll pages, navigate links, and read the page content or console logs. In essence, it’s like having an AI-driven Selenium, but easier. You simply instruct it in natural language what to test. For example: “Open the app and test the contact form: check that an error shows if the fields are empty, that an invalid email is caught, and that a success message appears for a valid submission.” The agent will understand this and carry out the steps: it might automatically click “Send” with empty fields, input an invalid email and submit, then fill in correct info and submit – checking each time what happens. All the while, it’s taking note of any JavaScript errors or network issues as well.
Visual Verification and Reports: After running the interactions, Antigravity will present you with a test report. This often includes a summary of what passed or failed and, impressively, screenshots or even recorded video of the test runs. The screenshots show the state of the app at each step (for instance, a screenshot of the form with error messages visible, another after a successful submission). This visual verification assures you that the UI behaved as expected – or highlights where it didn’t. In many cases, seeing the sequence of screenshots is as good as watching a QA engineer manually test the feature. You can quickly spot layout issues or missing feedback.
Try this prompt:
“Update the checkout button CSS to match the new design system. Then, use the browser to navigate to the cart, click the button, and save a screenshot of the resulting modal as an Artifact named ‘verification_proof.png’.”
- Use Cases for Browser Agent: This tool shines for web apps, but can also be used for any workflow that involves a browser. For example, you could have the agent scrape information from an internal web dashboard or perform an automated sequence on a third-party site (though note that for the agent to control your browser, you’ll need the Antigravity Chrome extension installed). Many developers use it to generate quick UI prototypes: have the agent build a frontend component and then immediately test it in the browser agent to verify it looks and works right. It’s also useful for regression testing: after the agent refactors a web module, have it run the browser agent on that feature to ensure nothing broke.
Keep in mind that, just like a human QA, the browser agent isn’t infallible. If the site has dynamic content or timing issues, you might need to guide it or add delays. But overall, it’s an incredibly advanced feature: an AI that not only writes your code but runs it live to make sure it actually works, saving you from many rounds of manual testing.
Fine-Tune AI Autonomy: Modes and Review Policies
Antigravity’s agents can operate at different speeds and autonomy levels. Getting familiar with the interaction modes and review settings is key to harnessing the AI effectively without sacrificing control:
Fast vs Planning Mode: Every conversation can be in Fast mode or Planning mode. Fast mode executes agent actions directly and is ideal for quick, straightforward tasks. Planning mode, on the other hand, has the agent think more deliberately – it generates a plan (task list, implementation steps, etc.) for you to review before any code is written. Use Fast for trivial changes or boilerplate generation, and Planning for complex, risky, or architecture-level tasks where you want oversight. You can toggle the mode at the start of a conversation or even mid-task as needed.
Review Policy: Antigravity introduces a Review Policy setting that determines how often the agent pauses for your approval. There are three options: Always Proceed (the AI performs all actions without asking), Agent Decides (the default, where the agent automatically asks for confirmation only when it’s unsure or the stakes are high), and Request Review (the agent waits for your confirmation on every significant step). Tuning this policy lets you dial in how autonomous the AI should be. For maximum safety on a new project, use the strict Request Review to intercept every change. As you gain confidence in the agent, you might relax to Agent Decides to reduce interruptions.
Terminal Execution Policy: Related to review, the installation flow also asks how the agent can execute terminal commands – from Off (never run commands autonomously) to Auto (run most but ask for dangerous ones) to Turbo (full autonomy in terminal). This can be adjusted based on your comfort level with letting the AI run build tools, tests, or package installs on its own. For experienced developers, Auto provides a good balance – the agent will handle routine commands but still prompt you if something potentially destructive is about to run.
By fine-tuning these modes and policies, you ensure the AI works with you. For instance, on experimental branches you might let the agent rip with minimal review, whereas in a critical codebase you keep it on a short leash.
The Bottom Line
In the end, coding with Antigravity can make work that used to be heavy suddenly feel lighter (hence the name Antigravity). So go ahead and explore these tips in your next session. Customize the IDE to your liking, experiment with multi-agent workflows, and push the boundaries of what an IDE can do. Happy coding, and enjoy the lift!